


Incredible Cheesecake Recipe - Best Ever!
Light, Creamy and Oh So Good.
This is no ordinary cheesecake recipe! It is light, creamy and ridiculously delicious. Trying this recipe once means you will be cheesecake-spoiled the rest of your life. It’s a chance you should take.
I think that I should be in the Guinness Book of World Records for sampling the most cheesecake in the history of man kind. It’s a tough job and one I am not fully finished with. I come from a long line of cheesecake consumers and I’ve been in training for this position since I was old enough to hold a fork. It’s my job and I accept it gladly. If there was a cheesecake-mobile (similar to that of the wiener-mobile) then I would travel from coast to coast delivering the good word of cheesecake to the masses.
Living in Chicago, Eli’s Cheesecake is the standard. In New York, it’s Junior’s Cheesecake. And let’s face it, there are countless Cheesecake companies (large and small) across the nation peddling their cheesecake as “the one.” Don’t get me wrong - they are delicious. Like the quest for the perfect burger I recognize that personal style preference places an important part of meeting my quest. In the interest of full disclosure, I love light, creamy and flavorful cheesecake. If you like a denser style of cheesecake then we probably need to agree to disagree. Those people can close out this post and move on to the next article. For those who appreciate an ultra creamy and light cheesecake - I’ve got you covered.
Let’s Talk Crust:
I respect a variety of crusts. Oreos, graham crackers, cake, shortbread and the list of crusts goes on and on. No doubt that the crust can greatly enhance the cheesecake “experience” but, for me, the crust should compliment the overall style and personality of the cheesecake that you want to make. A brownie bottom is perfect for chocolate peanut butter cheesecake. A shortbread crust may be perfect with a vanilla cheesecake with cherries. I recently made a gluten-free cheesecake for a friend in which I omitted the crust all together. The cheesecake was incredibly delicious on it’s own - nothing missed. I am not “married” to a particular crust but I am wildly in love with the vanilla cheesecake batter than can be adapted to fit your flavor profile. The crust I am featuring in this post is nutty, crunchy and a great compliment to vanilla cheesecake.
Pecan- Graham Crust:
Ingredients:
1/2 cup Ground Pecans
1/2 cup Ground Graham Crackers
1 Tablespoon White Granulated Sugar
2 Tablespoons Melted Butter
Pinch Salt
Directions:
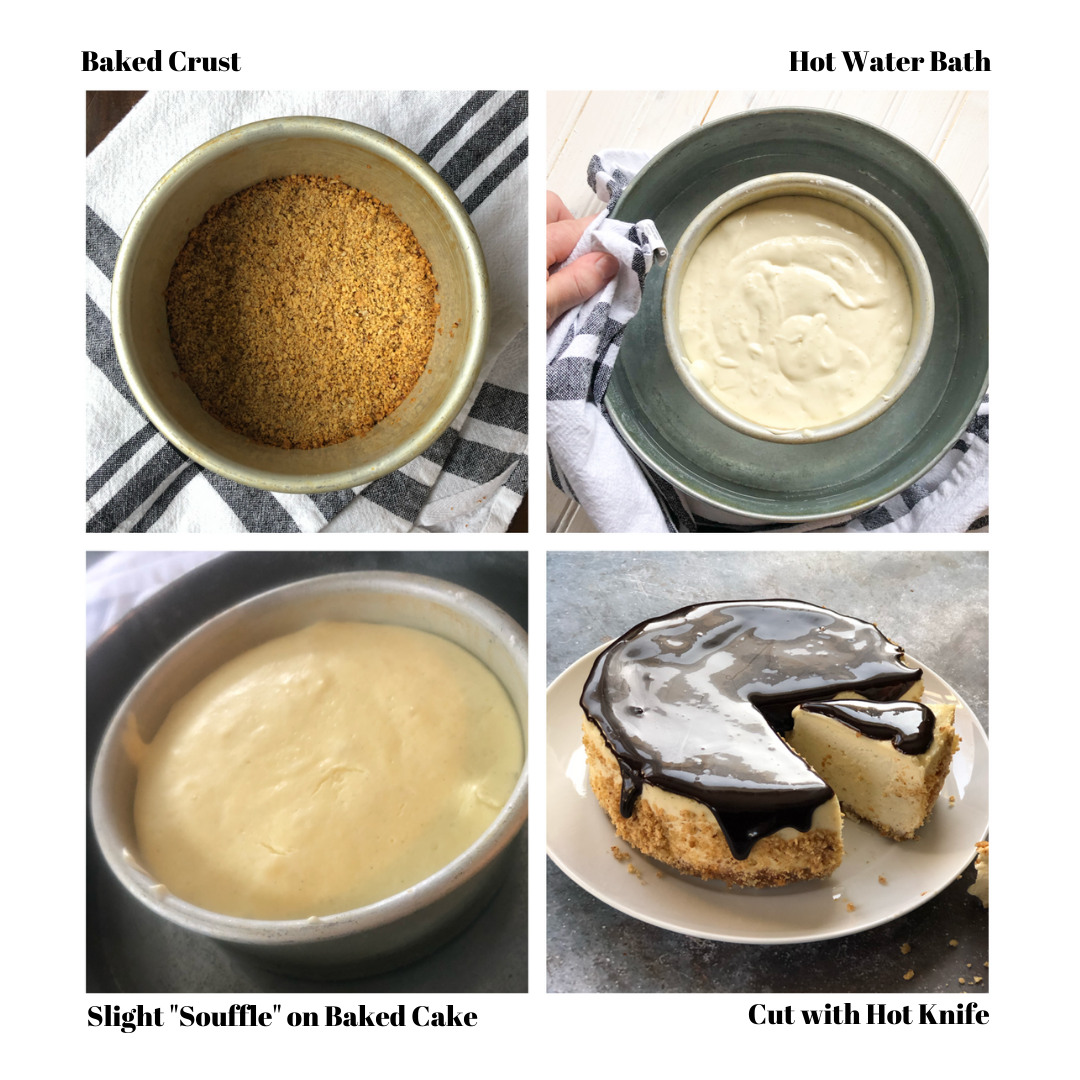
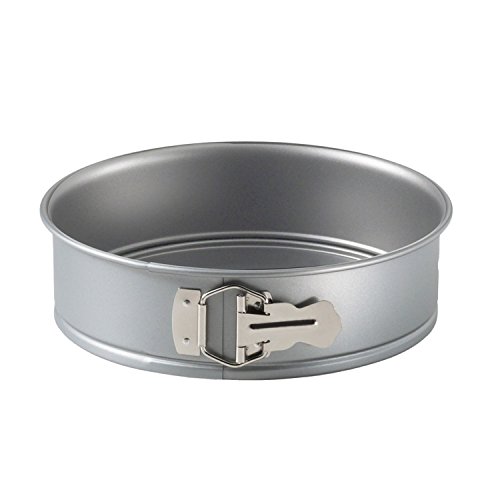
Spray a 9 inch baking pan with Pan spray. The pan can be a spring-form style pan or regular cake pan. Line the bottom of the pan with parchment. Mix ingredients together and place in the bottom of a 9 inch pan. Press crust down to form a nice even crust. Bake in a 350 degree Fahrenheit (conventional) oven for 7 minutes. Remove from the oven and allow the crust to cool while you are preparing the cheesecake batter.
Vanilla Cheesecake Batter
Ingredients:
4 Packages of Cream Cheese (room temperature)
1 cup of Granulated Sugar
2 Tablespoon of Pure Vanilla Extract or Paste
4 Eggs (room temperature)
1 cup Sour Cream (room temperature)
6 Tablespoons Cornstarch
Directions:
Preheat oven to 325 degree Fahrenheit.
Using a stand-up electric mixer with a paddle attachment, place the cream cheese and sugar in the mixing bowl. Cream the sugar and cream cheese together for approximately 3 minutes.
Stop the mixer and use a rubber spatula to scrape down the sides and bottom of the bowl. Continue to paddle for an additional minute to make sure the cream cheese is smooth and has no lumps. Your goal is to make sure the mixture is smooth - not to incorporate air. Scrape down the sides additional times as needed.
Add room temperature eggs (one at a time) while continuing to blend the mixture together. Scrape down the side and bottom of the bowl again to ensure the mixture is smooth.
Add the vanilla to the cream cheese mixture.
Add the sour cream and cornstarch to the mixture and paddle until incorporated. Scrape down the side and bottom of the bowl with the rubber spatula again to ensure the mixture is smooth. If you would like to add chocolate chips or other ingredients to your batter, you may do it now.
Poor the batter on top of the crust.
The cheesecake will need to be baked in a hot water bath. See the picture above for a reference. To create a hot water bath, select a pan larger than the cheesecake pan. Fill the pan with hot water. Add the cheesecake pan so it sits in the larger pan. The water should cover 1/3 of the way up the sides of the cheesecake pan.

9. Bake at 325 degrees until the cheesecake batter slightly souffles and feels “set" to the touch. Based on your pan and oven, your cheesecake may take approximately 1 hour to bake. A finished baked cheesecake actually feels like a baby’s bottom. (Don’t laugh - it does!) All ovens bake differently so be sure to monitor your cheesecake.
10. Remove finished cheesecake from the oven and allow it to sit in the water bath until the cake pan is cool enough to remove. Allow the cheesecake to cool (in the pan) the refrigerator overnight.
Removing The Cheesecake From the Pan:
Once the cheesecake is completely cooled (and chilled in the refrigerator overnight) then you are ready to remove the cake from the pan.
If you are using a spring-form pan:
Take a paring knife and run it under hot water. Once hot, run the knife around the outside of the actually cheesecake to help it free itself from the pan. Disengage the clasp on the pan and the the sides of the pan should free itself from the cake. Gently life the crust from underneath and place on a serving platter or stand.
If you are using a traditional cake pan:
Take a paring knife and run it under hot water. Once hot, run the knife around the outside of the actually cheesecake to help it free itself from the pan. Place a large pot on the stove and heat enough water so that you can dip the entire cheesecake pan into the hot water to slightly melt the sides and soften the butter in the crust. Remove the pan from the water and flip the cheesecake out on to a plate or cake board. Remove the pan from the upside down cake. Use another plate or cake board to flip the cake right side up.
Presenting Your Cheesecake
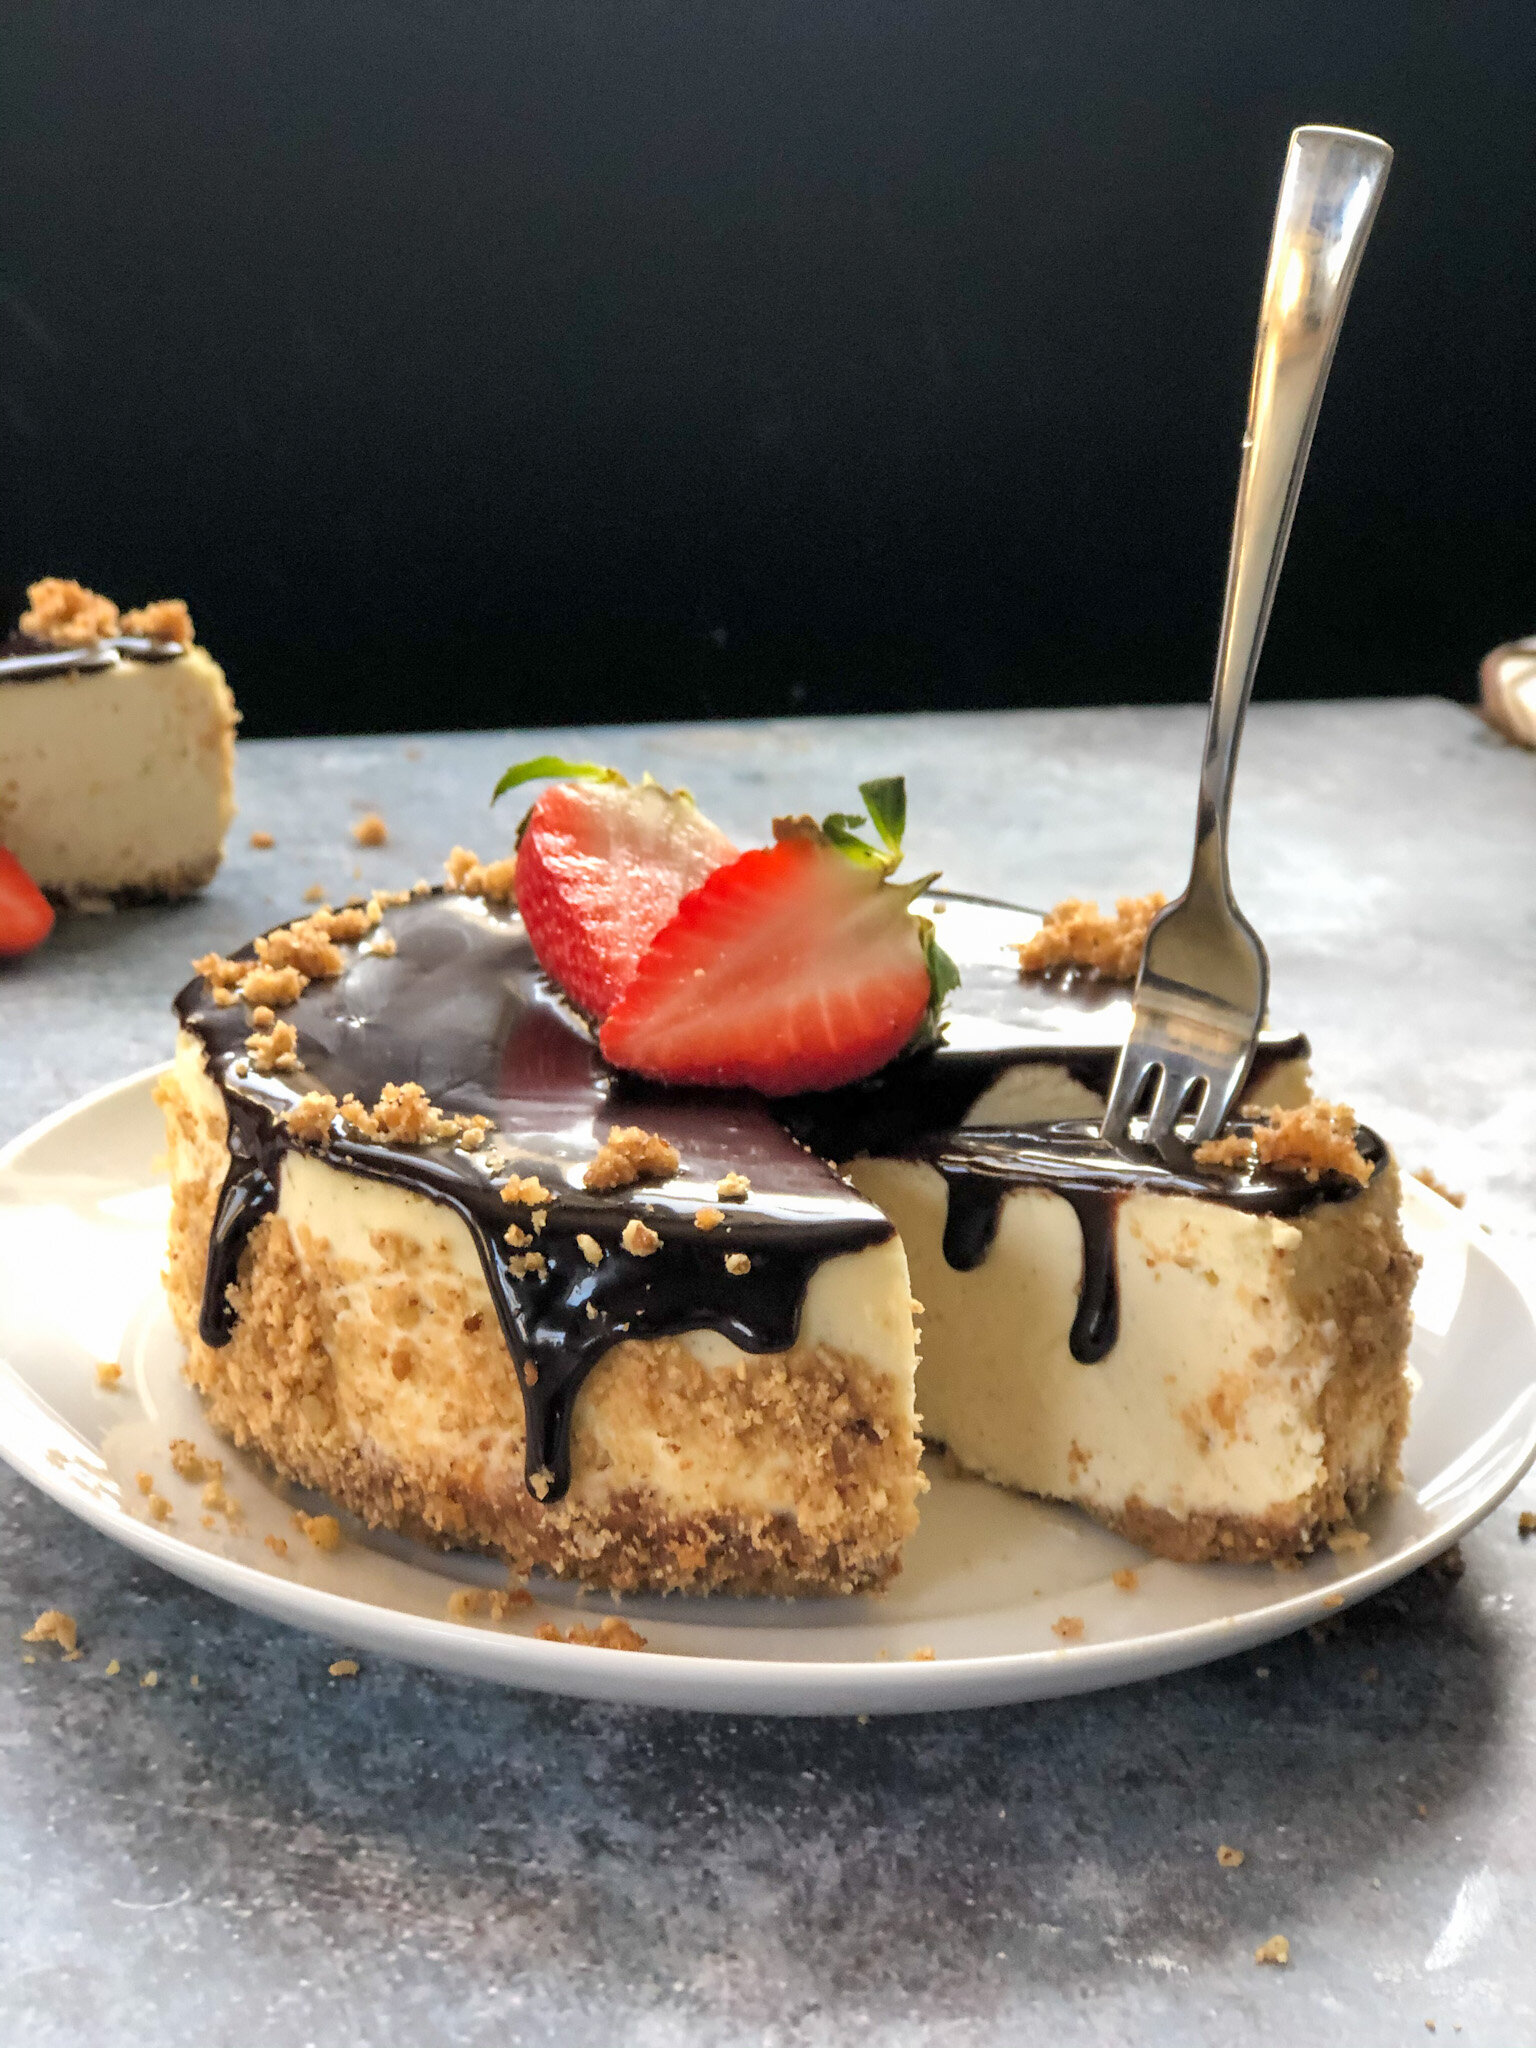
Use your creativity to flavor and decorate your cheesecake! I topped mine with chocolate sauce, strawberries and a few crust crumbs. Once decorated, return your cheesecake to the refrigerator. Remove just before serving and don’t forget to use a hot knife to cut your cheesecake. Enjoy!


